Showing 3183 items matching tram 3
-
 Ballarat Tramway Museum
Photograph - ESCo Bendigo tram 3, 1930s
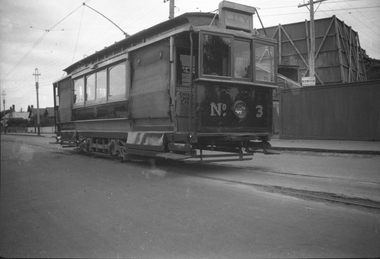
... ESCo Bendigo tram 3...tram 3...Photograph of Bendigo Tram No 3 at the tram depot...Photograph of Bendigo Tram No 3 at the tram depot ...Photograph of Bendigo Tram No 3 at the tram depot, with the destination of Depot. Tram in the ESCo Red and Cream colour scheme with the tram number on the side of the vehicle. The tram commenced life with the Hawthorn Tramway Trust as their No. 8. Became No. 114 when the MMTB took over, sold to the SEC in 1931 and became Bendigo No. 3. It was donated to the AETA in 1956 and subsequently rebuilt as HTT 8. The tram is on display at the Melbourne Tram Museum Hawthorn. See reference for further details. One of a series of 7 photos (items 9108 to 9114) possibly taken at the time of the SEC takeover in 1934 to illustrate the type of tram that was being used at Bendigo. Possibly an SEC report photo. Based on the book Destination Eaglehawk, most likely from the Basil Miller collection.Yields information about Bendigo tram 3 during the mid 1930s.Photograph, black and white with notes on rear.In ink on rear "No. 3 - Electric Supply Co of Victoria (Prior to 1934 when SEC acquired the undertaking), and Ken Magor stamp.tramways, trams, bendigo, tram 3, aeta, tram 8 -
 Ballarat Tramway Museum
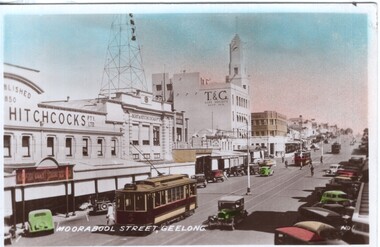
Photograph, Moorabool Street Geelong - tram 3, late 1940s
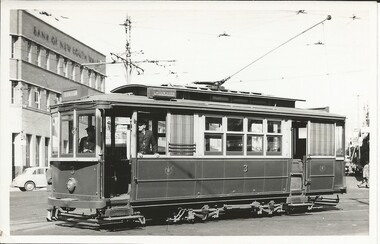
... Moorabool Street Geelong - tram 3... - No. 1" Moorabool Street Geelong - tram 3 Photograph ...The colour print of Moorabool Street Geelong shows SEC No. 3 just to the south of Malop St. Has Hitchcocks, T & G building and the Bank of NSW buildings in the view. The tram is shown with a red colour scheme which is incorrect, should be green. There are two other trams in the view. Possibly a Kodak print.Yields information about the Moorabool St Geelong, late 1940s.Colour photograph titled "Moorabool Street Geelong - No. 1"In pencil on rear "No. 3 car". Ken Magor stamp and in pencil "K McCarthy No. 71" tramways, trams, geelong, moorabool st, tram 8 -
 Ballarat Tramway Museum
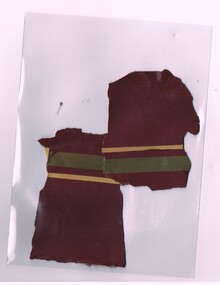
Functional object, Preston Workshops, W6 939, restaurant tram No. 3, c1990's
... W6 939, restaurant tram No. 3..., restaurant tram No. 3, during Feb. 2015. Shows the base colour... chip scraped off the roof line of W6 939, restaurant tram No. 3 ...Sample of paint chip scraped off the roof line of W6 939, restaurant tram No. 3, during Feb. 2015. Shows the base colour of the paint applied to the tram (would have faded), and striping. Two separate samples retained.trams, tramways, restaurant tram, paintwork -
 Ballarat Tramway Museum
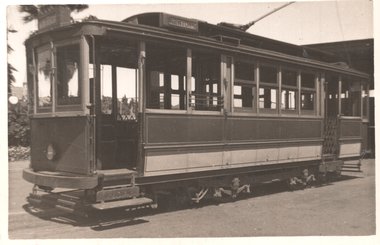
Photograph - Geelong 3 at Railway Station, Ken McCarthy, 4-2-1948
... tram 3...The photo shows Geelong tram No. 3 at the railway station... the Geelong railway station terminus and tram 3. tramways trams ...The photo shows Geelong tram No. 3 at the railway station with the destination of Newtown. Photo by Ken McCarthy 4-2-1948Yields information about the Geelong railway station terminus and tram 3.Black and white photograph with stamped details on rear.Typed on rear "No. 3 car SEC Geelong 4 Feb 1948, copyright K McCarthy, Photo No. 76". Ken Magor stamp as well" tramways, trams, geelong, tram 3, railway, railway station -
 Ballarat Tramway Museum
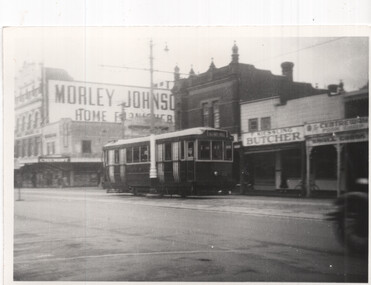
photograph - Set of 5 Black & White - Bendigo tramways, Peter Duckett, early 1950s
... tram 3... No. 3 at the depot. 3 - Tram 7 on a Quarry Hill service. 4... and F. Kessling Butcher 2 - Tram No. 3 at the depot. 3 - Tram 7 ...Set of five photographs of Bendigo trams photographed by Peter Duckett, early 1950s 1 - Bendigo 22 in Mitchell Street. Tram has the destination of Quarry Hill. In the background is the Morley Johnson Home furnisher and F. Kessling Butcher 2 - Tram No. 3 at the depot. 3 - Tram 7 on a Quarry Hill service. 4 - Bogie tram 24 at the depot 5 - Track cleaner - scrubber and another ex Melbourne single trucker at the depot.Yields information about Bendigo trams early 1950sSet of five black and white photographs by Peter Duckett.Details the image on the rear of the print in ink.bendigo, tramcars, bendigo tramways, quarry hill, charing cross, mitchell st, tram 22, tram 3, tram 7, tram 24, scrubber tram -
 Ballarat Tramway Museum
Newspaper, ex VR tram, Corowa 3/1959, Mar. 1959
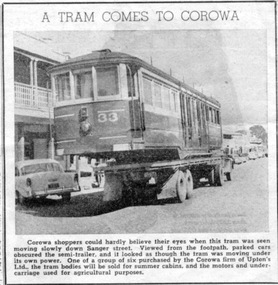
... ex VR tram, Corowa 3/1959... of six bodies to Corowa. ex VR tram, Corowa 3/1959 Newspaper ...Newspaper clipping of former St Kilda - Black Rock tramway (Operated by Victorian Railways) tramcar No. 33, on semitrailer passing through town of Corowa on way to form summer cabins - Newspaper unknown, one of six bodies to Corowa.On top "keep" and on bottom "Mar 19th 59". On rear has "432" in a box.trams, tramways, vr trams, corowa, scrapped trams, disposal -
 Ballarat Tramway Museum
Photograph - Black & White Photograph/s, c1918
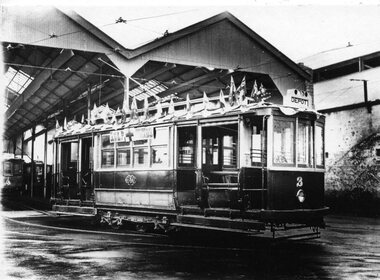
... tram 3... printer?) of Geelong Cross bench tram No. 3, in the Geelong Depot... printer?) of Geelong Cross bench tram No. 3, in the Geelong Depot ...Yields information about the form and style of the early Geelong trams and how they were used with trailers for football matches.Black and white photograph, printed onto card (inkjet printer?) of Geelong Cross bench tram No. 3, in the Geelong Depot yard, decorated with Australian flags and a "Help + Funds" = Red Cross during First World War. C1918?"Geelong Hist Soc / William Scott Collection." in ink.trams, tramways, geelong, depot, red cross, world war 1, tram 3 -
 Melbourne Tram Museum
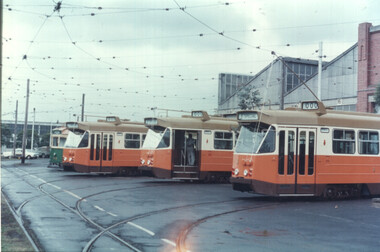
Slide, Z class trams 2 & 3 West Preston, May 1975
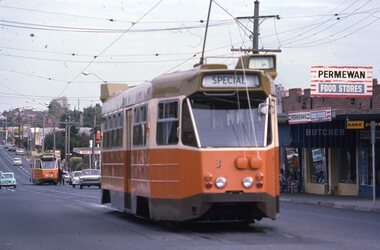
... tram 3...Colour slide of Z class trams 2 and 3 at the West Preston... Colour slide of Z class trams 2 and 3 at the West Preston ...Colour slide of Z class trams 2 and 3 at the West Preston terminus, both showing Special. Most likely being tested prior to entering service late June 1975. The slide is dated May 1975. In the background is a Permewan food store and a Commonwealth Bank.Yields information about Z class trams 2 and 3.Kodachrome colour slides, cardboard mount.tramways, z class, new tram, west preston, tram 2, tram 3 -
 Ballarat Tramway Museum
Photograph - Black & White Photograph/s - set of 2, George Bishop, Dec. 1971
... tram 3...Two Black and White photograph of a in-bound bogie tram... of a in-bound bogie tram No. 3, 12/1971 descending Mitchell St Bendigo ...Two Black and White photograph of a in-bound bogie tram No. 3, 12/1971 descending Mitchell St Bendigo, just after the start of the double track near the railway station. Photo has Glendon House on the left hand side. Photo by George Bishop. Tram has the destination "Eaglehawk"On the back of the photos in ink "Outside Glendon House Bendigo / G. Bishop photo" and in pencil on 3609.2 "No. 3 near Rly Station Bendigo, Dec 1971, Destination Eaglehawk: and "George Bishop Photo"tramways, trams, bendigo, mitchell st, railway station, tram 3 -
 Ballarat Tramway Museum
Slide - 35mm slide/s, Travis Jeffrey, late 1960's or early 1970's
... tram 3... of Bendigo Nos. 3 and 26 at Charing Cross. The trams are bound.... 3 and 26 at Charing Cross. The trams are bound for Eaglehawk ...Agfa plastic mount (blue base, white cover) with a photo of Bendigo Nos. 3 and 26 at Charing Cross. The trams are bound for Eaglehawk, Quarry Hill respectively. Photo shows the traffic arrangements at Charing Cross prior to closure. Photo taken late 1960's early 1970's from the window of another tram. No. 3 has two roof advertisement racks which are empty, while No. 26 has a SEC briquettes roof advertisement."BES 48" in pencil.tramways, trams, bendigo, charing cross, tram 3, tram 26 -
 Ballarat Tramway Museum
Photograph - Black & White Photograph/s, Wal Jack, 24/06/1949 12:00:00 AM
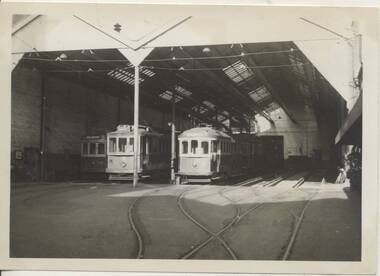
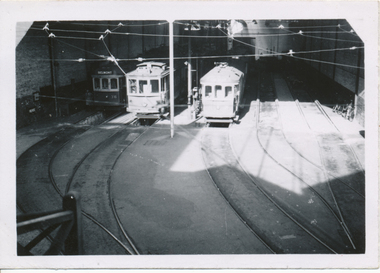
... tram 3... of Geelong trams 36, 3 and 31, inside the depot at Geelong 24-6-1949.... Photograph of Geelong trams 36, 3 and 31, inside the depot at Geelong ...Black and White print contained within the Wal Jack Bendigo and Geelong Album, see Reg Item 5003 for more details. Photograph of Geelong trams 36, 3 and 31, inside the depot at Geelong 24-6-1949. Shows the Geelong trackwork at the depot and overhead. Photo by Wal Jack. See Also Reg item 5889 for an elevated photograph. i1 - scan of print in the album i2 - rear of image i3 - scan of negative at 3200dpi added 29/6/2020.On rear in ink SEC Geelong / Nos. 36, 3, 31 inside sheds (from ground level), Geelong depot / 24-6-1949". Has the Wal Jack copyright stamp in the top right hand corner with the number T297 written in.trams, tramways, geelong, depot, tram 36, tram 3, tram 31 -
 Ballarat Tramway Museum
Photograph - Colour Photograph/s, 21/11/1962 12:00:00 AM
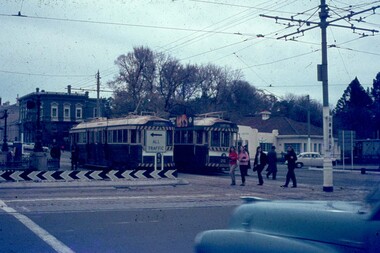
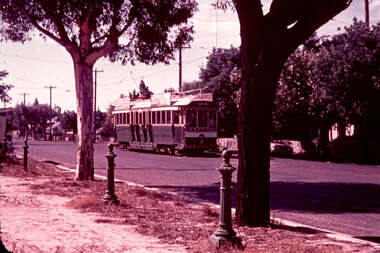
... tram 3...Colour print of Bendigo SECV Bendigo tram 3 travelling... Photograph Colour print of Bendigo SECV Bendigo tram 3 travelling ...Colour print of Bendigo SECV Bendigo tram 3 travelling High St Eaglehawk towards the Eaglehawk Terminus. Photo taken after the tram has passed the photographer. On Kodacolor paper with a Kodak red ink stamp on rear. Tram has dash canopy lights, but no large white strip under the drivers windows. Photo not dated but appears to be at about the same time as 977, 21.11.1962. Has Eaglehawk Town Hall and Post office in background and shops along the south side of High St. Tram showing destination of "Eaglehawk". Tram has White Horse Whiskey ad and another on front dash panel and two roof ads. In photo are advertisements for "Hutton's Bacon" and "Sennett's Ice Cream" on shop roof advertisements.On rear top left hand corner "3"eaglehawk, bendigo, town hall., high st, tram 3 -
 Melbourne Tram Museum
Document - Report, Public transport Unions, "Metplan - Industry Unions - Briefing Paper No. 3 - Tram System Extensions", "Metplan Discussion Paper", 1987 to 1988
... "Metplan - Industry Unions - Briefing Paper No. 3 - Tram... Unions - Briefing Paper No. 3 - Tram System Extensions" - March... - "Metplan - Industry Unions - Briefing Paper No. 3 - Tram System ...Set of four photocopied documents, A4 sheets, stapled in top left hand corner concerning the development and adoption of Metplan, a Metropolitan Public Transport Industry Plan - see Reg Item 1186 for a discussion paper. .1 - "Metplan - Industry Unions - Briefing Paper No. 3 - Tram System Extensions" - March 1988 - 16 sheets - one of series of four documents to give Public Transport Unions where the industry is heading over the 15 years project life period. document looks at the Docklands Light Rail in London and bus services through the Central district of Melbourne. .2 - "Metplan Draft Document - January 1988" - 5 pages - prepared by Martin Gray - December 1987 - looking at training, working conditions, employment security, station staff and service delivery and job opportunities. .3 - "Metplan Discussion Paper" - 3 sheets - gives an overview of the suburban system, union's role, what could be done, electrification, rail cars, station development, dual voltage systems. .4 - "Metplan Discussion Paper" - table looking at the various measures, percentage changes, Metplan issues, services, finance and extension options. See also Reg item 2809 for a August 1988 paper and 345 for a detailed report.trams, tramways, ptc, metplan, unions, buses, tramways, public transport, suburban and underground -
 Melbourne Tram Museum
Photograph - Colour print - Z's 1, 2, 3 at Preston Workshops, June 1975
... tram 3...Colour print showing Z1 class trams, 1, 2, and 3 on the fan... Colour print showing Z1 class trams, 1, 2, and 3 on the fan ...Colour print showing Z1 class trams, 1, 2, and 3 on the fan at Preston Workshops, possibly late May or June 1975 at the time of entry into service. All the trams are showing special. In the background is a W7, possibly 1036. Yields information about the then new Z1 class trams at the time of the entry into service. Colour print on Kodak Royal paper.trams, tramways, z1 class, tram 1, tram 2, tram 3 -
 Ballarat Tramway Museum
Slide - 35mm slide/s, Max Michell, Apr. 1972
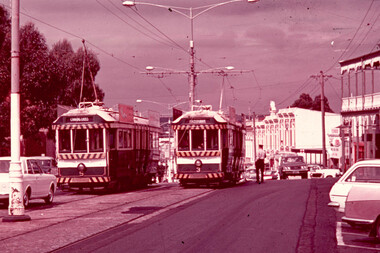
... tram 3... Strip" of Bendigo trams Nos. 3 and 5 in View St., near Rowan St..." of Bendigo trams Nos. 3 and 5 in View St., near Rowan St. No. 3 has ...White cardboard mount, 35mm slide, from the Association of Railway Enthusiast's film strip titled "Provincial Tramway Film Strip" of Bendigo trams Nos. 3 and 5 in View St., near Rowan St. No. 3 has destination of Eaglehawk, while No. 5, inbound has destination of Charing Cross. An SEC Employee is standing by the rear of No. 3 The film strip notes (Reg. Item 2560), provided the following caption details: "Bogie cars 3 & 5 (running out of course due to an earlier failure) meet on the double track at the Bendigo end of the "EAGLEHAWK" Line - Apr. '72 (Max Michell)" See image btm2592p.tif for high level scan of image. Stamped on base of slide "11802" and written in ink on top edge "No 3 & 5 Eaglehawk line Bendigo"tramways, trams, are, film strip, view st, bendigo, tram 3, tram 5 -
 Ballarat Tramway Museum
Photograph - Black & White Photograph/s, No. 3 Ripon St - Ballarat A, 16/03/1935
... tram 3...Photograph of ESCO Ballarat No. 3. Shows tram with blinds...Photograph of ESCO Ballarat No. 3. Shows tram with blinds ...Photograph of ESCO Ballarat No. 3. Shows tram with blinds drawn, covers over the wooden slats to prevent people standing on them at either end of the tram, beneath the blinds, has "Enter Front Entrance" sign. Tram has the destination of "City", See Notes for various copy history. Yields information about Ballarat ESCo. No. 3 in a modified form and the nature of the modifications.Black and white photograph, and copy negativeRay Pearson's captions included in the scanned images., .2 - Wal Jack's notes are "Ballarat 'old type' No. 3, Ripon St 16-3-1935, (1905 - 1935). W. Jack T2"trams, tramways, esco, ballarat, tram 3 -
 Ballarat Tramway Museum
Slide - 27 mm sq slide/s - set of 3 - tram stop shelters, Lilian Butler, c1971
... 27 mm sq slide/s - set of 3 - tram stop shelters... Butler. Slide 27 mm sq slide/s - set of 3 - tram stop shelters ...Yields information about some of the tramway shelters in Ballarat.Set of Hanimex colour slides in a white cardboard mount of Ballarat tramway shelters. .1 - tramway shelter at Haddon St - note this shelter has been since rebuilt. .2 - Shelter at Ripon St - middle of Sturt St east side of intersection - has Ampol Service station in background. .3 - ditto with the Western Hotel in the view. Photo from the collection of Lilian Butler. ballarat, tramways, trams, shelters, sturt st, ripon st -
 Melbourne Tram Museum
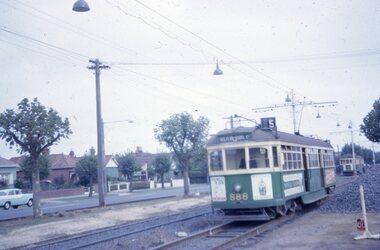
Album - Robert Thomson Slide Collection, "Melbourne AETA 1964", 1964
... tram 3... Park Elgar Rd" RT208 Hawthorn Depot 25-3-64 - trams 582 & 841... Park Elgar Rd" RT208 Hawthorn Depot 25-3-64 - trams 582 & 841 ...Photo - see pdf file for further information. Number Brief Description RT198 SW6 888 Dandenong Rd 1-4-64 - "Malvern Rd Burke Rd" - route 5 RT199 W2 552 Dandenong Rd 1-4-64 - "City" - route 5 RT200 W3 655 Dandenong Rd 1-4-64 - "City" - route 64 RT201 SW6 951 St Kilda Beach 1-4-64 - "Kew Cotham Rd" - route 69 RT202 10 W3 667 East Coburg 1-4-64 - "South Melb Beach" - route 1 RT203 W5 826 top of Latrobe St (?) 1-4-64 - "City via La Trobe St" - RT204 L 105 Carnegie 1-4-64 -"city" - route 4 RT205 L 101 Carnegie 1-4-64 - "University" - route 4 RT206 tram 612 - "Burwood" - Batman Ave (?) RT207 Y1 611 Batman Ave 4-4-64 - "Wattle Park Elgar Rd" RT208 Hawthorn Depot 25-3-64 - trams 582 & 841 RT209 L 105 City Swanston St 25-3-64 route 4B RT210 SW6 853 Chapel St Richmond 25-3-64 -"Prahran" - route 77 RT211 L 102 City Swanston St 25-3-64 - "Carnegie" - route 4 RT212 27-4-62 - tram 495 - "Camberwell" - route 7 & tram 334 RT213 tram 11 - "Special" Flinders St RT214 March 1964 - tram 779 - "West Coburg via William St" - route 55 RT215 March 1964 W7 Collins St - tram 1024 - "Northcote via St Georges Rd" - route 9A RT216 March 1964 Victoria Parade - tram 892 - "City" - route 42 RT217 March 1964 Spring St - tram 1034 - "East Preston" - route 88 RT218 March 1964 Essendon Terminus - tram 741 - "City" - route 59 RT219 1964 AETA Convention - tram 672 - "City" RT220 1964 AETA Convention - tram 672 - "West Coburg Bell St" RT221 1964 AETA Convention - tram 676 - "Leura Grove" RT222 1964 AETA Convention - tram 672 - "Special" tram bridge RT223 1964 AETA Convention - tram 672 - "Special" RT224 1964 AETA Convention - tram 676 - "Burwood" RT225 1964 AETA Convention - tram 672 - "City" - route 59 RT226 1964 AETA Convention - tram 672 - "Special" RT227 1964 AETA Convention - tram 469 - "Special" & tram 895 - "City" - route 2A RT228 1964 AETA Convention - tram south melb depot works yard Demonstrates the work of Robert Thomson in photography, collection and/or production of slidesAssembled album in a black presentation folder of 31 colour slides, collected or produced by Robert Thomson. All photographs have been scanned and placed on the Museum's G drive. A list of all photographs with details has been compiled. melbourne, tramways, trams, mmtb, hawthorn depot, sw6 class, w2 class, w3 class, w4 class, w5 class, w7 class, y class, y1 class, x2 class, sw5 class, l class, south melbourne per-way yard, tram 11, tram 3, tram 9, tram 485, tram 676, tram 672, tram 1024, tram 1034, tram 841, tram 469, tram 611, tram 612, tram 101, tram 102, tram 105, tram 826, tram 779, tram 741, tram 655, tram 467, tram 552, tram 582, tram 495, tram 334, tram 888, tram 951, tram 853, tram 892, tram 895, route 59, route 2a, route 88, route 42, route 9a, route 55, route 7, route 4, route 77, route 4b, route 1, route 69, route 64, route 5 -
 Ballarat Tramway Museum
Slide - 35mm slide/s - set of 17, Noel Simons, 20/11/1962 12:00:00 AM
... tram 3... and another roof ad. Shows the Y terminus at this location, but tram... Traction Night Photo tram 2 tram 3 tram 4 tram 7 tram 11 tram 18 ...Set of 17 transparencies taken on 20/11/1962 on Kodak mounts. 1187.1 - Bendigo No. 2 at the Quarry Hill terminus, showing destination of Quarry Hill. Has Cohns Drinks and Streets Ice Cream ads on dash panel, a SEC 'electric cooking' roof ad and another roof ad. Shows the Y terminus at this location, but tram standing just before it. Overhead in position. 1187.2 - as above, but closer up. 1187.3 - as above, but from the north side, showing cemetery in the background. 1187.4 - Bendigo No.3 at Eaglehawk terminus. Tram showing destination of Quarry Hill. Has the various buildings at Eaglehawk in the background including the Foodland store. Has Streets Ice cream and White Horse Whiskey ads on the dash panel. 1187.5 - Bendigo No. 18 at Garden Gully crossing loop, in bound, with destination of Eaglehawk. Passengers waiting for an Eaglehawk tram at the stop. Has a white horse whiskey ad on dash panel and SEC roof ads. Conductor standing in doorway looking out. 1187.6 - Bendigo No. 7 inbound in Nolan St. at cnr of McCrae St. showing destination of Golden Square. Has Streets Ice cream ad on dash panel and a Castrol Roof ad. 1187.7 - Bendigo No. 19 at the North Bendigo terminus with railway level crossing in background. Tram has a Cohns Drinks ad and an SEC 'Electric Cooking' roof ad. 1187.8 - Bendigo No. 2 at the Quarry Hill terminus, looking back into Bendigo, showing destination of Eaglehawk. 1187.9 - Bendigo No. 21 in McCrae St, near Nolan St outbound for North Bendigo. Photo taken after tram has passed photographer. 1187.10 - Bendigo Nos. 4 and 26 at Charing Cross in View St. with fountain alongside and the Beehive, Ezywalkin Buildings in the background. No. 26 has a Sandhurst Milk and SEC 'Electric Cooking' roof ad. 1187.11 - close up of 22E maximum traction truck and folded footstep. 1187.12 - Bendigo No. 19 at Charing Cross terminus, after tram has passed photographer, showing destination of North Bendigo, with the Beehive building in the background and passengers boarding tram. 1187.13 - Bendigo No. 11, turning from View St. into Pall Mall, showing Special with the conductor holding point bar. Has the Beehive and Ezywalkin Buildings in the background. 1187.14 - No. 7 at Charing Cross terminus, in Pall Mall, bound for Golden Square. Has the Beehive and Ezywalkin buildings in the background and passengers waiting at the tram stop. 1187.15 - No. 18 at the Charing Cross terminus, bound for Eaglehawk. Has the Beehive and Ezywalkin buildings in the background and passengers waiting at the tram stop. Also has the 'Safety Zone' sign in the photograph. 1187.16 - No. 2 at Quarry Hill terminus, night or dusk photo. Tram showing destination of Depot. 1187.17 - No. 26 at Charing Cross, night photo. Tram has destination of Quarry Hill, but is on the line for Eaglehawk. Photo looks along Mitchell St. Also shows Safety Zone sign. Information written on in black ink and date stamped on purple ink. 1187.1 - "No. 2 at Quarry Hill terminus Bendigo" 1187.2 - "No. 2 at Quarry Hill terminus Bendigo" 1187.3 - "No. 2 at Quarry Hill terminus Bendigo" 1187.4 - "No. 3 at Eaglehawk terminus" 1187.5 - "No. 18 in Mt Korong Road, Long Gully at cnr of Havilah Road (Eaglehawk Route)" 1187.6 - "No. 7 in Nolan St. Bendigo, at Cnr of McCrae St., near lake Weeroona, (North Bendigo Route)' 1187.7 - "No. 19 at North Bendigo terminus" 1187.8 - "No. 2 at Quarry Hill terminus" 1187.9 - "No. 21 in McCrae St. Bendigo, near Nolan St. (North Bendigo Route) 1187.10 - "4 and 26 at Alexandra Fountain, Charing Cross Bendigo" 1187.11 - "Truck of Bogie Car, Bendigo Tramways" 1187.12 - "No. 19 in Pall Mall at Charing Cross, Bendigo" 1187.13 - "Birney car No. 11 entering Pall Mall from View St. at Charing Cross Bendigo" 1187.14 - "No. 7 in Pall Mall at Charing Cross, Bendigo" 1187.15 - "No. 18 at Alexandra Fountain, Charing Cross, Bendigo" 1187.16 - "No. 2 at Quarry Hill terminus, Bendigo" 1187.17 - "No. 26 at Alexandra Fountain, Charing Cross, Bendigo" tramways, trams, bendigo, quarry hill, eaglehawk, north bendigo, maximum traction, night photo, tram 2, tram 3, tram 4, tram 7, tram 11, tram 18, tram 19, tram 21, tram 26 -
 Ballarat Tramway Museum
Slide - 35mm slide/s, Noel Simons, 21/11/1962 12:00:00 AM
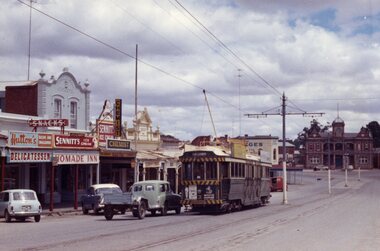
... tram 3... North Bendigo Golden Square tram 2 tram 3 tram 4 tram 11 tram 17 ...Set of 17 transparencies taken on 21/11/1962 on Kodak mounts. 1188.1 - Bendigo No. 11 at Depot Junction McCrae and Arnold St. with driver/conductor changing points. 1188.2 - Bendigo No. 4 at Charing Cross, side on photo, with City Club Hotel and Alexandra Fountain in the background. Tram has Castrol and SEC 'Electric Cooking' ads. 1188.3 - Bendigo No. 4 climbing View St. after tram has passed photographer. Tram has Streets Ice Cream and Cohns Soft Drinks ad on rear dash panel. In the background are the buildings in View St., including the Princess Theatre. Tram has destination of Eaglehawk. 1188.4 - Trams 2 and 4 crossing at the California Gully or Thorpe St Loop. 1188.5 - Bendigo 4 in Mt Korong Road. Tram inbound with destination of Quarry Hill, just leaving Garden Gully Loop. 1188.6 - Bendigo 4 and 17 crossing at the Hayes St. or Iron Bark Gully Loop. No. 17 bound for Eaglehawk, No. 4, Quarry Hill. 17 has two SEC roof ads and a white horse whiskey ad. 1188.7 - No. 17 bound for Eaglehawk, soon after leaving California Gully. Has large mullock heap in background. 1188.8 - Bendigo 2 and 17 crossing at the Thorpe St. or California Gully Loop. Has butchers shop in background. 1188.9 - Bendigo 17 at the Eaglehawk terminus. Has destination of Quarry Hill. In background is the hotel and shops at the terminus, showing ads for "Melbourne Bitter". Tram has two SEC 'Electric Cooking' ads. Driver and conductor about to assist two lady passengers with a pram and baby. 1188.10 - No. 17 at Eaglehawk terminus, awaiting departure. Has Eaglehawk Town Hall and Post Office in background. Tram has a Whitehorse Whiskey ad on the front dash panel. 1188.11 - No. 3 in High St. Eaglehawk, with destination of Eaglehawk. Has the shops on the south side of High St. in the background, including the Eaglehawk fish shop. Tram has two roof ads, one an SEC roof ad, and Cohns Drinks and Streets Ice cream ads on front dash panel. 1188.12 - as above, but after tram has passed photographer. Note the centre of the road poles. 1188.13 - No. 2 outbound for Eaglehawk at the intersection of Mt. Korong Road and the Calder Highway. Photo taken after the tram has passed the photographer. Has an Ampol service station in the background. 1188.14 - No. 11 leaving the Bendigo depot, crossing the bridge, with the Scrubber car in the background. 1188.15 - No. 21 at the North Bendigo terminus. Tram has destination of Golden Square and Cohns drink ad on front dash and two roof ads on side. 1188.16 - No. 11 on Golden Square route, in High St. at intersection with Old High St. 1188.17 - No. 11 at the Golden Square terminus, conductor turning the pole. Hotel on the left side of the photo. Note the road works barrier and red flag behind the tram. Slide has an end of roll mark on the right hand side of the image.Information written on in black ink and date stamped on purple ink. 1188.1 - "Birney car No. 11 in McCrae St. at Cnr of Arnold about to run into depot, Bendigo" 1188.2 - "No. 4 at Alexandra Fountain, Charing Cross Bendigo" 1188.3 - "No. 4 climbing the View St. Hill from Charing Cross, Bendigo (Eaglehawk Route)" 1188.4 - "No. 4 and 2 at Thorpe St. Loop, California Gully" 1188.5 - "No. 4 in Mt Korong Rd., Long Gully, Near Havilah Rd. (Bendigo) (Eaglehawk Route)" 1188.6 - "Nos. 17 and 4 crossing on Hayes St. Loop, Ironbark, Bendigo" 1188.7 - "No. 17 soon after leaving California Gully (Eaglehawk Route)" 1188.8 - "No.2 and 17 crossing on Thorpe St. Loop, California Gully (Eaglehawk Route)" 1188.9 - "No. 17 at Eaglehawk terminus" 1188.10 - "No. 17 at Eaglehawk terminus" 1188.11 - "No. 3 in High St. Eaglehawk" 1188.12 - "No. 3 nearing Eaglehawk terminus" 1188.13 - "No. 2 in Mt. Korong Rd., Ironbark. Calder highway on left (Eaglehawk route) 1188.14 - "Birney car No. 11 leaving Bendigo depot. Scrubber car at rear" 1188.15 - "No. 21 at North Bendigo Terminus" 1188.16 - "Birney car No. 11 in High St. Bendigo at intersection with Old High Street (Golden Square Route)" 1188.17 - "Birney Car No. 11 at Golden Square terminus, High St., Bendigo". tramways, trams, bendigo, depot junction, charing cross, view st., eaglehawk, north bendigo, golden square, tram 2, tram 3, tram 4, tram 11, tram 17, tram 21, tram scrubber -
 Ballarat Tramway Museum
Slide - 35mm slide/s - set of 4, Noel Simons, Apr. 1972
... tram 3... trams Bendigo Long Gully Quarry Hill View St. tram 3 tram 5 tram ...Set of 4 transparencies - copy slides - possibly ARE film strip dated April 1972. 1210.3 on Kodak Readymount mount. 1210.1 - No. 3 arriving at Quarry Hill terminus. 1210.2 - Bogie car at Long Gully Loop, in the far distance, with a Hotel and the ESSO service station in between. Has Fosters Lager and Carlton signs on hotel. Note sign on the closet pole - "No standing between Notices" 1210.3 - Nos. 26 (Quarry Hill) and 25 (Eaglehawk) at Jobs Gully Loop. 1201.4 - No. 5 showing Charing Cross in bound for Charing Cross and No. 3 en route for Eaglehawk in View St. near the end of the double track. Appears to be SEC employee at the rear of No. 3. Part of a set of 20 slides made by the Association of Railway Enthusiast Provincial Tramways film strip. Reference Item 2560 details the ARE Film Strip and provide references to other slides.Information written on in blue ink and date stamped on purple ink. 1210.1 - "No. 3 arriving at Quarry Hill terminus." 1210.2 - "Bogie car at Long Gully Loop." 1210.3 - "Nos. 26 and 25 at Jobs Gully Loop." 1210.4 - "Nos 5 and 3 in View St. near the end of the double track."tramways, trams, bendigo, long gully, quarry hill, view st., tram 3, tram 5, tram 25, tram 26 -
 Ballarat Tramway Museum
Photograph - Digital image Set of 20, Dec. 1970
... tram 3... tram 2 tram 3 tram 6 tram 28 tram 18 ...Set of 20 digital images of Bendigo Tramways December 1970 by Stuart Lodington. .1 - Bendigo track gang renewing a joint, McCrae St, with welding truck alongside and Birney No. 29. .2 - No. 5 at Quarry Hill terminus? .3 - No. 24 at the depot .4 - No. 2 on the Quarry Hill line .5 - No. 5 approaching the Eaglehawk terminus .6 - No. 29? at the Golden Square Terminus with Bill Rodda's Golden Square hotel in the background. .7 - No. 3 inbound on the Quarry Hill line. .8 - trams crossing on the Eaglehawk line, through the window of one tram. .9 - side on view of a B23D controller in a bogie tram .10 - No. 5 at the Eaglehawk terminus .11 - No. 21 at No. 21 crossing on the Golden Square line. No. 29 showing special, No.21 - North Bendigo, Fire Station Loop? .12 - No. 29 and another tram - near work site? .13 - interior view from Birney looking at the front of another tram parked behind. .14 - No. 29, No. 6 crossing at .15 - No. 6, showing special at Charing Cross. .16 - No. 5 and another tram at North Bendigo on a Special .17 - No. 28 at Charing Cross .18 - No. 5 on Special at a Loop on the Eaglehawk line .19 - No. 28, and two other trams at the Myrtle St Loop .20 - No. 18 showing Quarry Hill and two other trams on View St.trams, tramways, bendigo, trackwork, mccrae st, depot, quarry hill, eaglehawk, golden square, controllers, north bendigo, view st, tram 29, tram 5, tram 24, tram 2, tram 3, tram 6, tram 28, tram 18 -
 Ballarat Tramway Museum
Photograph - Digital image Set of 20, 1971-72
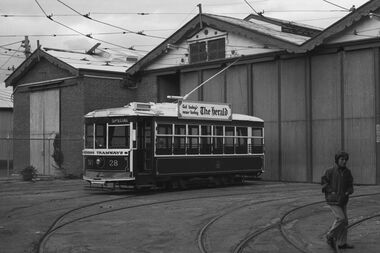
... tram 3... Cross tram 29 tram 18 tram 24 tram 3 tram 7 tram 6 tram 26 ...Set of 20 digital images of Bendigo Tramways, 1972 at or before closure while on a tram tour by Stuart Lodington. .1 - No. 29 at the North Bendigo terminus .2 - No. 29 just past the Bendigo end of the double track in High St Eaglehawk, with a BP dealer in the background. .3 - Night photo of No. 18 at a terminus, showing "Eaglehawk" .4 - ditto .5 - Night photo of No. 24 at Eaglehawk with Leo A Hughes Photographer in the background. The Tram has "Johnnie Walker whiskey" roof adverts. .6 - No. 29 outbound in Thunder St with a train passing over the bridge in the background. .7 - view from the front window of a tram on the Eaglehawk line with a large "display event float" in the foreground and tram approaching a crossing loop. .8 - No. 29 at North Bendigo .9 - view of High St Eaglehawk looking east from the terminus, showing the track and centre poles. .10 - No. 29 outbound on the North Bendigo line turning from either Nolan St or Caledonia St, running a special. .11 - No. 7 departing North Bendigo for Golden Square. .12 - No. 3 and 18 at Charing Cross. No. 3 has two SEC roof Advertisements .13 - No. 7 at North Bendigo with the trolley pole being reversed. .14 - No. 24 at Quarry Hill with Northern Terrazzo in the background with the driver alongside .15 - No. 7 and No.6 at Charing Cross with the Beehive buildings in the background. .16 - No. 7 at North Bendigo terminus .17 - ditto .18 - No. 24 at Quarry Hill with Northern Terrazzo in the background with the conductor alongside. .19 - ditto .20 - No. 26 and other bogie tram in View St near Charing Cross with the Armstrong Tyre Service building and signs for Cohn's Drinks and T&G in the view.trams, tramways, bendigo, eaglehawk, quarry hill, golden square, depot, north bendigo, charing cross, tram 29, tram 18, tram 24, tram 3, tram 7, tram 6, tram 26 -
 Ballarat Tramway Museum
Photograph - Digital image Set of 20, 1971-72
... tram 3.... .3 - front view of a tram in View St with a blurred ...Set of 22 digital images of Bendigo Tramways, 1972 at or before closure while on a tram tour by Stuart Lodington. .1 - No. 7 arriving at North Bendigo .2 - No. 5 departing Charing Cross along View St, with a Firestone tyres in the background. .3 - front view of a tram in View St with a blurred background image. .4 - No. 24 showing Eaglehawk destination .5 - No 26 and 3 in View St, with the Armstrong Tyre Service building in the background and signs for T&G and Cohn's Drinks. .6 - ditto .7 - No. 3 arriving at Charing Cross from Eaglehawk in View St, with a Quarry Hill destination. .8 - No. 3 and 18 at Charing Cross. .9 - No. 24 on the Quarry Hill line. .10 - No 26 in View St, with the Armstrong Tyre Service building in the background and signs for T&G and Cohn's Drinks. .11 - ditto, with fountain in view, Colonial Mutual building and a newsagent with a Herald sign on the building. .12 - No. 7 at North Bendigo terminus .13 - ditto with pole being reversed. .14 - No. 18 at Quarry Hill terminus with Northern Terrazzo sign in the background. .15 - No. 24 at Quarry Hill terminus .16 - No. 18 arriving at Charring Cross, with Fountain Plaza and Bendigo Pharmacy in the background. .17 - No. 3 and 18 at Charing Cross. .18 - No. 7 at North Bendigo terminus with pole being placed on the overhead. .19 - No. 26 in View St inbound, with Sandhurst Trustees sign in the background. .20 - No. 6 leaving Charing Cross in Pall Mall with Myer and other buildings in the background. .21 - No. 7 at North Bendigo .22 - Single trucker with two roof Advertisements crossing View St with fountain in view, Colonial Mutual building and a newsagent with a Herald sign on the building.trams, tramways, bendigo, eaglehawk, quarry hill, north bendigo, charing cross, view st, tram 7, tram 5, tram 24, tram 26, tram 5, tram 3, tram 18, tram 6 -
 Ballarat Tramway Museum
Photograph - Digital image Set of 2, Doug Colquhoun, c1955
... tram 3... Conductors North Beach Belmont Safety Zone tram 3 tram 4 tram 5 tram ...Set of six digital images of Geelong trams photographed by Doug Colquhoun. .1 - No. 3 with destination of Station turning from Ryrie into Moorabool St with the Bank of New South Wales in the background. The conductor is watching the traffic. .2 - No. 4 - at the Railway Station or Beach terminus? .3 - No. 5 - in Ryrie St? .4 - No. 19 in St. with E. R. Sparrow & Co Auctioneer and Wool Broker building in the background - Moorabool St, tram has the destination of Beach. .5 - No. 23 with the conductor leaning against the bumper bar chatting to a man. Tram has the destination of North. Has a Kodak - E. A. O'Meara Chemist shop in the background. Ryrie and Moorabool Streets Geelong looking south along Moorabool St, along with a Safety Zone sign. .6 - No. 34 with the destination of Belmont.trams, tramways, geelong, ryrie st, moorabool st, conductors, north, beach, belmont, safety zone, tram 3, tram 4, tram 5, tram 19, tram 23, tram 34 -
 Ballarat Tramway Museum
Negative, Bruce Herbert, "Bendigo and Ballarat Trams (AETA Convention) 30 Mar 1975", 30/03/1975 12:00:00 AM
... tram 28 tram 19 tram 30 tram 18 tram 24 tram 3 tram 12... and another bogie tram in side the depot 4 - No. 3? inside the depot ...Negative folder - made by ROW1 International of West Germany containing 40 No. 35 mm negatives of the AETA 1975 Convention visit to Ballarat and Bendigo on 30-3-1975. 17 photos of Ballarat and 23 of Bendigo. Bendigo photos: 1 - No. 28 at the depot 2 - ditto 3 - 24 and another bogie tram in side the depot 4 - No. 3? inside the depot 5 - 12, scrubber - 17 and two bogie trams 6 - scrubber and other bogie trams. 7 - general view with 24 and other bogie trams 8 - ditto 9 - Four trams at the Gold Mine, lead by 28. 10 - 19 at the Gold Mine 11 - single trucker with "tram tours" sign on the front 12 - 28 and two other cars at the Joss House, North Bendigo 13 - 19 and two other cars at the Joss House 14 - 30 at depot junction and loop 15 - 28 and 18 16 - 18 in the loop 17 - 28 and 18 McCrae St 18 - 28, 18 and 30 ditto 19 - 19 20 - No. 18 and 28 in Pall Mall with The Beehive in the background. Outside the building is an American Doughnut Kitchen van. The junction trackwork for the Eaglehawk lines remain in position. 21 - No. 30 northbound, with the City Family Hotel and other shops in the background. 22 - ditto and the cenotaph, 23 - B74 on a train at Spencer St. trams, tramways, btps, ballarat, aeta, bendigo, bendigo trust, depot, mccrae st, tram 28 tram 19 tram 30 tram 18 tram 24 tram 3 tram 12 tram 17 tram scrubber -
 Ballarat Tramway Museum
Photograph - Black & White Photograph/s, Wal Jack, 24/06/1949 12:00:00 AM
... tram 3... 3 tram 31 Wal Jack ...Black and White print contained within the Wal Jack Bendigo and Geelong Album, see Reg Item 5003 for more details. Photo of Geelong Nos 36, 3 and 31 at the depot building entrance, or inside depot, 24-6-1949. Photo by Wal Jack from the Roster Room landing. Shows the depot track arrangements. See Also Reg item 5891 for a ground level photograph. i1 - scan of print in the album i2 - rear of image i3 - scan of negative at 3200dpi added 18/6/2020. On rear in ink SEC Geelong / Nos. 36, 3, 31 inside depot from Roster Room landing / 24-6-1949". Has the Wal Jack copyright stamp in the top right hand corner with the number T296 written in.trams, tramways, geelong, depot, tram 36, tram 3, tram 31 -
 Ballarat Tramway Museum
Slide - 35mm slide/s - set of 4, Campbell Duncan, 1971 or 1972
... tram 3... trams Bendigo Quarry Hill Eaglehawk View St tram 3 tram 5 tram ...Set of four colour slide on Agfacolour - black and white plastic mounts. .1 - Bendigo No. 3 on a Quarry Hill service .2 - Bendigo No. 5, in High St Eaglehawk, inbound to Quarry Hill. Has a former Masonic Hall? in the background - now part of the Eaglehawk Primary School. .3. - Bendigo 26, en route to Quarry Hill, on Quarry hill line? with a BP service station in the background. .4 - Bendigo 5, descending View St to Charing Cross.tramways, trams, bendigo, quarry hill, eaglehawk, view st, tram 3, tram 5, tram 26 -
 Melbourne Tram Museum
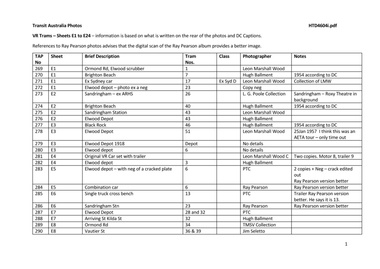
Album - Photo Album, Transit Australia Publishing, "TAP - Part E - VR Trams – Sheets E1 to E24 ", 1950's to 1990's
... tram 3... tram 6 tram 3 tram 13 tram 23 tram 28 tram 32 tram 34 tram 36 ...Photo Album - titled "TAP - Part E - VR Trams – Sheets E1 to E24 ", from Transit Australia Publishing. Photos used in the Destination City and other publications series. For a detailed list of photographs see htd4604i.pdf. For individual photo images see: \dbtext\hawthtramcoll\photo collections\TAP-Part D, images TAP269 to TAP315. TAP269_1-scrubber-OrmondRd_c1943_LeonMarcshallWood.jpg (Bob Lilburn notes in a letter to Keith Kings, photo dated 10/1942 - see 4064.1 in the same folder) TAP270_7_BrightonBeach_1954_HughBallment.jpg TAP271_17_ex-Sydney_LeonMarshallWoodCollection.jpg TAP272_23_ElwoodDepotTurntable.jpg TAP273_26_SandringhamDepot_LGPooleColln.jpg TAP274_40_BrightonBeach_1954_HughBallment.jpg TAP275_43_Sandringham_1943_LeonMarshallWood.jpg TAP276_43_ElwoodDepot_HughBallment.jpg TAP277_48_BlackRock_1954_HughBallment.jpg TAP278_51_ElwoodDepot_25Jan1957_LeonMarshallWood.jpg TAP279_ElwoodDepot_1918.jpg TAP280_6-ElwoodDepot.jpg TAP281_8-9trailer_LeonMarshallWoodCollection.jpg TAP282_3_ElwoodDepot_HughBallment.jpg TAP283_6_ElwoodDepot.jpg TAP284_6_ElwoodDepot_RayPearsonColln.jpg TAP285_trailer_ElwoodDepot_PTC.jpg TAP286_23_Sandringham_RayPearson.jpg TAP287_28-32_ElwoodDepot_PTC.jpg TAP288_32_StKilda_HughBallment.jpg TAP289_34_OrrmondRd_TMSV.jpg TAP291_37_ElwoodDepot_LindsayCrowe.jpg TAP292_36-39_VautierSt_JimSeletto.jpg TAP292_36-52_ElwoodDepot_1959_JimSeletto.jpg TAP293_40-33_ElwoodDepot_HughBallment.jpg TAP294_41_StKildaStation_1959_JimSeletto.jpg TAP295_43_StKildaStation_HughBallment.jpg TAP296_48_BlackRock_1954_HughBallment.jpg TAP297_51_Sandringham_LindsayCrowe.jpg TAP298_51_leaving-Sandringham_HughBallment.jpg TAP299_51_Sandringham_RayPearson.jpg TAP300_50_Sandringham_1955_GeoffGrant.jpg TAP301_LuxuryCar_Elwood_VictorianRailways.jpg TAP302_52_leaving-StKilda_HughBallment.jpg TAP303_53_ElwoodDepot_HughBallment.jpg TAP304_53-40_StKilda_NoelReed_19Jan1954.jpg TAP305_54_ElwoodDepot_NoelReed.jpg TAP306_Esplanade_MiddleBrighton_TMSV.jpg TAP307_BrightonBeach_TMSV.jpg TAP308_SandringhamStation_TMSV.jpg TAP309_34_ElwoodDepot_JimSeletto.jpg TAP310_34_Yarrambat_JimSeletto.jpg TAP312_34_Elwood_VictorianRailways.jpg TAP313_43_StKildaStation_HughBallment.jpg TAP314_43-894_StKildaStation.jpg TAP315_53_VautierSt_JimSeletto.jpgtrams, tramways, transit australia, destination city, tramcars, depots, vr, victorian railways, st kilda brighton, sandringham, tram 1, tram 7, tram 17, tram 23, tram 26, tram 40, tram 43, tram 46, tram 51, tram 6, tram 3, tram 13, tram 23, tram 28, tram 32, tram 34, tram 36, tram 39, tram 37, tram 52, tram 40, tram 43, tram 41, tram 48, tram 51, tram 50, tram 53, tram 4, tram 54, tram 42 -
 Melbourne Tram Museum
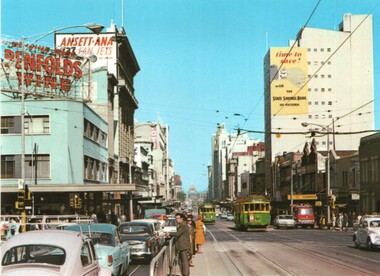
Album - Photo Album, Brian Weedon, Tramway photos, 1970 to 1980's
... tram 3... tram 3 tram 6 tram 28 tram 405 tram 29 tram 432 tram 1017 tram ...Photo Album - green card slip case containing heavy grey card covers front and rear, front protective page and 12 photo pages with adhesive surface and clear plastic sheet cover - on cardboard sheet bound by a heavy white comb binder marked "Photo Album" on the front inside cover. Each page has scanned to a pdf file. Page 1 - newspaper cutting and two photos of Ballarat No. 27 completing 1,000,000 miles. Item from "A Place in the Sun" written by Keith Dunstan. Photo of tram 27 by the Ballarat Courier. Date of Photo. 29/6/1968, taken prior to the TMSV Tour of that date. Black and white photograph of a group of the passengers on No. 27 during the celebration of the tram reaching 1,000,000 (million) miles in Ballarat. Glenys George, Brian Weedon, John Fitzsimons, Graeme Turnball, Paul Nicholson, Barry George and Kevin Clark. Page 2 - black and white photograph of Geelong Nos 2, 8, 4, 1 and another 4 wheel tramcar and a open cab motor bus photographed within the interior of Geelong depot, prior to 1924. From notes provided by David O'Neill, 12/2003, advises that bus driver is either Bill Hamaling or Charles Stafford. Gentlemen next to No. 8 could be Vic Phipps. Page 3 - Black and White photograph of Geelong No. 7 - c1912, soon after opening with driver, conductor and passengers. Shows the magnetic brake shoe. Page 4 - Black and White photograph of Geelong Cross bench tram No. 11 in Corio Tce, now Brougham St outside Marks Hotel. Tram has the destination of Newtown. Page 5 - Black and White photograph - T 180, showing "Pyrotechnic Fty" possibly on No. 9 Road at Malvern Depot Page 6 - Black and White photograph of L 105 prior to any modifications - see also Reg Item 2498 for another print. - ditto - interior view show off centre seats in the drop centre. Page 7 - Black and White photographs of W308 and W1 419 - - see also Reg Item 3422 for another print. Page 8 - Black and White photograph of W3 665 Page 9 - Black and White photograph of W4 670 - - see also Reg Item 3154 for another print. - ditto Interior view. Page 10 - Black and White photograph of SW6 850 with the dash canopy lighting - as built. - ditto Interior view - - see also Reg Item 674 and 3426 for another prints. Page 11 - not used. Page 12 - Black and White photographs of Y469 and X2 674 (This tram was later renumbered 680 - see page 30 of Destination City 5th Edition). - - see also Reg Item 3161 an d 3427 respectively for another prints. Page 13 - Black and White photographs of Y1 611 and an interior view - - see also Reg Item 3160 for another print. Page 14 - Set of 6 colour prints of Bendigo 28 decorated as the 1968 Myer Christmas tram, Birney 23 and 29. Page 15 - Set of 4 colour prints of Bendigo 3, 17, 6 and 17, Page 16 - Colour print of traffic and trams on Princes Bridge with Batman Ave terminus in the view. - Postcard of Swanston St looking south just north of Lonsdale St with W2 432 and another W2. See 3558.1 for a loose copy of the postcard - NuColorVue No. BP 1060-1 - titled on rear "A view towards the Shrine during peak traffic" Has signs advertising Penfolds Wines, Ansett-ANA, State Savings Bank and Foys. Page 17 - Set of two colour postcards - W2 405 and another tram southbound in St Kilda Road with the Prince Henry hospital in the background and Bourke St with W7 1026 and other trams in the view. Page 18 - Set of two photographs of W2's in Collins St at Spring St, with No. 512 in the view. Page 19 - View looking across the Gardens with two W2 class trams in Macarthur St. - W2 637 at corner of Collins and Exhibition St - see also Reg Item 1999 for another print. Page 20 - set of three colour photographs - W2 303 in bound on St Kilda Road, destination City, Route 4D, see also Reg Item 324 - W7 965 turning from Queens Road into St Kilda Road at St Kilda Junction. - W4 671 at South Melbourne Depot. Page 21 - not used Page 22 - MMTB Bus 702 Mark VI MMTB Freighter body and W7 1035 Page 23 - not used Page 24 - SEC coal locomotive 108 at night. Most photographs are MMTB Official. Listed 22-5-2019trams, tramways, melbourne, geelong, ballarat, bendigo, postcards, l class, interiors, new trams, mmtb, t class, w class, w1 class, w3 class, w4 class, sw6 class, y class, x2 class, princes bridge, batman ave, swanston st, st kilda rd, bourke st, collins st, macarthur st, st kilda junction, w7 class, buses, secv, tram 27, tram 2, tram 8, tram 1026, tram 4, tram 1, tram 11, tram 105, tram 308, tram 419, tram 665, tram 670, tram 850, tram 469, tram 674, tram 611, tram 23, tram 29, tram 17, tram 3, tram 6, tram 28, tram 405, tram 29, tram 432, tram 1017, tram 512, tram 303, tram 965, tram 671, tram 1035, tram 637